Amenti BGP week 7-10

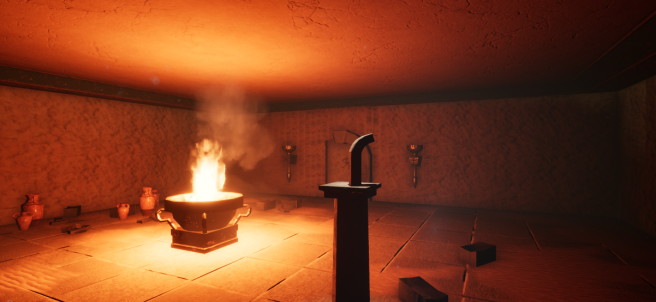
The last three weeks of the project a lot of things happened in the game. The first week, week seven, a lot of light and foliage was added by me in the game. The reason being so that the level did not look too empty when we were going to show it on the beta play test. The beta play test was at Thursday so the group worked hard to fix as much things in the game as possible. Because when several people are working on the same project, people can’t work on the same levels as the other as that will create a merge conflict when the persons tries to upload the changes. So to tackle this problem we had one level for each person in the group and one Main Level. When someone was finished with their changes in their level and if no one was working in the Main Level, the person can transfer the changes to the Main Level and upload it so the other group members can download the changes. So this day I transferred all my light changes from my level to the Main Level so that every one in the group got the same changes. Same thing with the foliage and I also added a light in the fire pits so that they can cast shadows. But we removed this the following week because of major performance issues. Apparently the point lights cast six shadows in all directions in real-time which costs a lot of performance. So this definitely had to be changed. I also imported my dust particles into the Main Level and I added “Godrays” that casts visible light much like through fog or dust so that we could light up points of interest.

The day before the beta play test me and Kevin sat really late to fix some small changes to the game. Some lights was added to light up the levels as we had gotten feedback on that the levels were too dark. We vertex painted all of the rooms so that the textures didn’t look too repetitive, we fixed some problems with the fire particles so that they looked like we wanted them to. The beta went well, the playtesters were happy and we got a lot of feedback to work on.

d68e40da79ebfd0c044362cc4c1dff6c
Vertex painted walls and floor also Godray and foliage were added

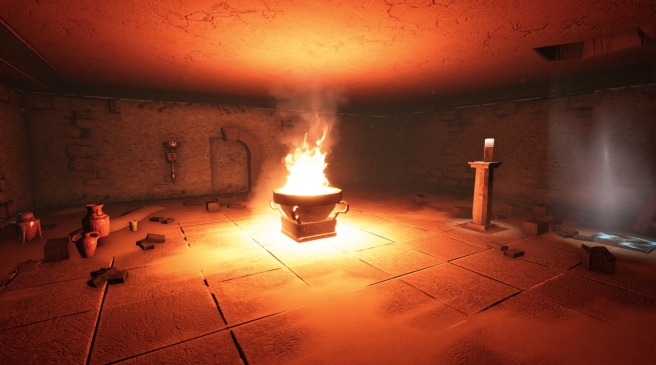
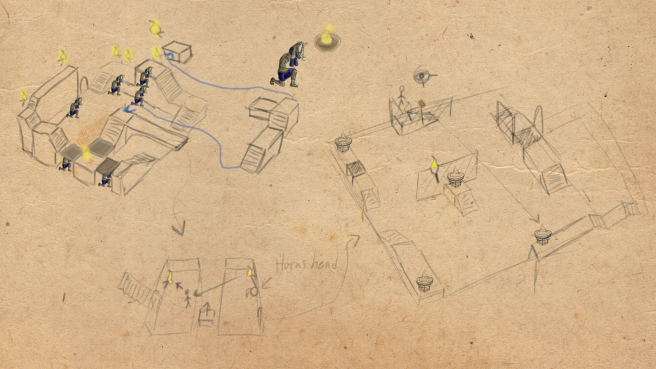
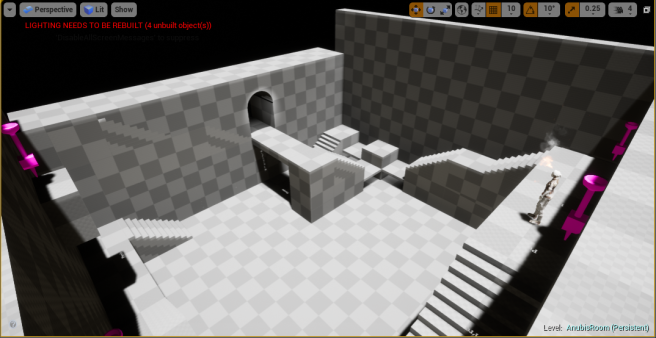
The following week we had some stuff to fix before the beta deadline. I had some things to do with the lighting and general quality of life stuff to add. I started to alter the helping hieroglyphs on the walls before the Horus puzzle and the Anubis puzzle. Players didn’t really notice which way they had to go first, either left or right, so I changed the Anubis hieroglyphs so that they were not lit when the player enters Hall of Statues for the first time. This made the player walk right the first time because the hieroglyphs outside of Horus were lit at all times. The Anubis hieroglyphs don’t get lit until the player has done the Horus puzzle and walked back into Hall of Statues. This made the players look towards the hieroglyphs and they wanted to walk there. Me and the Technical Artist Kevin Alonso stayed some time one day and fixed a more effectual entrance to the Hall of Statues the first time the players went there. At first I did a script that lit the fires in a sequence from first to last. Before this the fires got lit when the player walked near them. I changed it so that when the player walked down from the corridor before the hall, the fires started lighting up regardless of the players position. This got a better feeling of awe and magic in the pyramid which we had tried to imply in the game design.

b89c2a0c19a4da82db73bdbc03818ad4
The first draft of the entrance to Hall of Statues

The next day me and Kevin made some changes to the entrance which included a new particle effect from Kevin and some changes to the script so that the speed was changed at which the fires lit up. I also changed so that three different particle effects spawned instead of one for every fire so that the repetition disappeared from the explosions.

0b38cdf5f99af2334a097ae3ce1bf0bd
The final draft of the entrance to Hall of Statues

I also fixed a bit with our animation tree this week. The reason being that our animations were not working as intended so I sat down to look in the code for the transitions between the animations and fixed up a bit so that it got a bit better, but it got nowhere near done. I also fixed so that some sand falls from the different platforms when the floor in Horus goes up or down a level for some more authenticity. The Beta went well and the play testers were happy about the game and we got some feedback on changes to make.

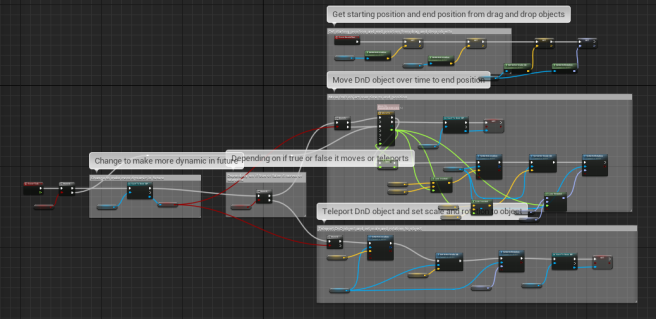
The following week was the week before GGC. This meant that we had to put in everything that wasn’t in the game yet. We also had to add some things from the feedback that we got. My objective this week was to spread out the particle effects in the whole level without costing any performance, add a door that closes behind the player in the Horus puzzle and Anubis puzzle and make it open again when the puzzle was completed. I started with adding the particles in the level. Instead of just making an emitter over the whole level I copied the existing one in the tutorial room and placed them in the whole level inactivated. I added a small script in each one that activated the emitter when the player walked into one. So there is only one, maximum of two, active at the same time, which saves a lot of performance and we could add pretty dense particle clouds at the same time. When this was done I jumped on making the doors close behind the player which I only did with a trigger box in the Anubis room and a trigger when the player lights the first torch in the Horus room. When the player has lit all torches in the Horus puzzle the door opens again and the same happens in the Anubis room. When the Anubis room is done there is a door that opens in the floor of Hall of Statues where the player goes down and the game ends. I fixed some sound bugs in that door so that the players could hear it open and know where to go.

Gotland Game Conference went very well, we had a blast and got a lot of useful feedback on how to make the game even better. We also loved all the positive feedback that we gained throughout the conference. We did not win any prices but we did get in second place for the “Best 2nd year project” price! Thank you to all the amazing people who played our game at GGC and also for reading my blog! I’ll come back next semester to make more games and learn a lot of more!

Amenti can be downloaded here.

This slideshow requires JavaScript.

Amenti week 6 BGP

This week I have spent the most on migrating the whole server to a git repository instead of subversion. I made this decision because there were too many problems with the subversion repository. The main problem being that a bug happened which resulted in the affected person had to delete the whole project and then download it again for it to work. After some ten repeats by different people I became fed up with how much time this took from me working on the project, so I began to research an alternative and my eyes was on git with sourcetree. The group was quiet negative against the choice of changing to sourcetree because of the problems it caused in their previous projects and also that having a local server is helping immensely with the upload and download speeds as we only have ADSL in the offices. So I looked around to see if I could find any tutorial on making a git repository on a local server. My research found that a lot of people were using bonobo git server for local hosting, which I started to install. It proved to be quiet a hassle because we hadn’t installed .NET 4.0 which required Windows Service pack 1. After installing all of the necessary programs, connecting was the only thing left. All I had to do was to access the folder where I had placed the bonobo git server and sourcetree recognized it as a git repository. All I had to do now was replicate it on all the computers from the group and then teach everyone on how to use sourcetree without accidentally deleting the whole project.

Later in the week I made a particle system that emits dust in the atmosphere to give a more realistic feeling to the rooms. This was made easy from the tutorial at udemy that I referenced in an earlier blog post where it shows how to make dust in your scene. As I’m not really literate on particles and certainly not cascade, which is Unreal Engines particle builder, I followed the tutorial and came out with a result I’m kind of happy with, but I will most definitely edit the effect to make it look better after the QA has taken a look at it.

ParticlesBlogg.PNG
Some particles are maybe visible in the screenshot!

Amenti week 5 BGP

Half the course is now almost done and the project is taking form. Art is starting to find its way into the game and the mechanics are pretty much done. This week was the alpha deadline and we were all working hard to make the game playable with an easy progression through the game.

Blueprint.PNG
New Blueprint

But first I fixed a blueprint so that we could use it more dynamically. The blueprint used to only be able to move a Pillar_BP reference to a position in the world when you were standing on a Horus_Eye_BP. We made it like this because we only planned for one perspective puzzle but after the alpha-playtest the players wanted more perspective elements in the puzzles so that meant that the script was pretty hard to use in other situations than the first. Instead of having references to objects in the blueprint I made it so that it used actors. An actor is an object in Unreal Engine that you can add components to or add scripts etc. to make them do things. Almost everything in our project is Actors, so this change made the script able to move any object in the game. I also made the option to either teleport or move the object gradually. This because the puzzles works differently from each other, so now we could choose how the object moves to the target. The puzzles are perspective oriented which means the player has to look in a specific direction, so I added the possibility to look at whatever object you want to to activate the movement of the object.

This week I also made the texture on the arm to change texture on trigger which transitions the texture into a burnt hand texture. This to make the player get feedback that feels somewhat realistic when he/she sets the characters hand on fire. The outcome turned out to be quite nice, but it is not final.

Amenti BGP week 4

One week until the alfa deadline and the project is going forward. This week I did a lot of work on the server so that every team member had access to the project.  The problems that I encountered was mostly about connecting SVN to source control in Unreal Engine. I put down about 6 hours only on trying to make the server work. This because of the magical land of computers where a thing that works on one computer doesn’t work on any other computer. Sometimes, for best feeling in the stomach, it works on all computers but one and it is also errors you have never seen before or there is no documentation on how to fix the errors. When you finally find someone with the same problem as you, the post was made 2010 and there is no answer to be seen. The solution was found when doing the same thing I had been trying to do for the whole day, which was to connect to the repository and link it to source control, but now it worked for some reason. Now everyone could finally work together in the same project and push their own work onto the levels.

Anubis Rooms.png
The concept art for the Anubis rooms

I also worked on white boxing the Anubis level. This was based on the concept art skiss that our lead designer made. I used the geometry brush in Unreal to make the boxes and stairs. This tool makes it really easy and quick to test the scale and placement of objects in a level. I could test the placement of the “moving stairs” part that was supposed to be in the level. It consists of a set of stairs that is supposed to move into place when the player looks at a specific point in the level. I could test where that point was best placed and also where the player is going to stand when looking at said point.  I also tested the placement of the torches so that the player could not skip parts of the puzzle but had to complete it in an almost specific order and also so that it did not feel impossible to complete.

blog
The white boxed Anubis level

Amenti BGP Week 3

Hello again! Week 3 has finished and a lot of work has begun. The design is finished and all the members of the group have started to work with different artifacts in the game and the prototypes have started to become playable. My job this week was to finish the tutorial room that Lead Programmer Niclas did not have time to work on.  The work I did was to make a pair of pillars move towards the wall when the player stood on a specific position. The process was pretty tedious because I lack knowledge in Unreal Engine. I made the script in blueprint visual scripting because we, the programmers, want to have the knowledge of both scripting and blueprint scripting so that we can teach each other what we know. The pillars were supposed to move to the wall and then become a door that opens so the player can walk through it. The problem that I had was that the movement was “easing-in” instead of going straight to the wall. I tried several different move nodes, but every one of them eased-in when they got close to the wall. On friday I solved it by noticing that several of the move nodes used the updated position of the pillar and then applied linear interpolation between the new position and the target position. This made the move node to never reach its target position. The solution was to save the start position and then interpolate between that and the target position. This made the pillar move with no easing and when I added a timeline node I could decide for how long the pillar was going to move. I set this to five seconds because that did not feel like too slow or too fast. After this worked I added the function that made the pillar only move while the player looked at the door. I made this because the puzzle itself is supposed to be a perspective puzzle where you have to look in a specific position to see the door in this example. I made this possible by making a Line Trace that started from the player and towards the players camera direction. The line trace sends out a line that collects data from objects that it intersects with. So in this example when the player stands on the eye in the tutorial room, the eye is the indication of a point of interest, the line trace starts to fire. When the player looks at something that is tagged with “Door” the program changes a boolean to true to indicate that the player is looking at the door. When this boolean is true the pillar starts to move and if the player looks away or steps off the eye the pillar stops. When the pillar has reached the wall, making the arch of the door, the door opens and the player can walk to the next puzzle.

I also finished the tutorial for building a realistic room.Blogg

Amenti Big Game Project week 1 & 2

The Big Game Project course has begun and the game developing is in motion in the groups. The first week has mainly been about planning of the project, like design document, office moving, game design etc. The group that I am a part of is Amenti. The game is about Sofia that explores the pyramids and gets her hand cursed. This hand has some magic properties that the player will discover throughout the play through, like controlling fire and the power to give and take life.

My task the first week was to set up a repository server. This included to find the best program, find out how to set it up on a local network, connect with several computers, push and pull from that server, set it up with Unreal and make that work with all the computers. The program that I chose was SVN. The reason being that it was free. When I tried with Perforce, which is also a popular program to use, you could only use it for free for a team of maximum 5 people, we are 7. The reason for not using git was because of the integration in Unreal with SVN which lets you check-out or lock the files that you are working on so that no one else can update that asset if you are already using it. When I followed the Unreal Engine documentation tutorial for setting up SVN as Source Control there was not much problems that interrupted me. Most of the time was allocated to research about which program to use.

The tutorial that I used for setting up the SVN repository.

I have also used a lot of time on tutorials to learn Unreal Engine as a program and to learn how to use C++ in the engine. There is a lot of basic stuff like how to build up simple rooms and to make pick-up able objects that I have learnt. With this I have been able to help our lead programmer in building the prototype rooms to test the mechanics in them. When all the tutorials are finished I will begin to program the prototypes for taking and giving life to objects in the game I will also help the lead programmer in setting up some coding structures and teach the group how to use the repository the right way for a purely preparatory reason

tutorial
The tutorial that I have been following

.

Last Blog Post

Nu är kursens slut väldigt nära och takten på projektet har ökats markant. Det har crunchat en hel del med många timmar per dag. Mycket har blivit gjort under dessa sista dagar vilket gör det svårt att välja bara en artifakt att skriva om. Det som har gjorts är mycket saker men för det mesta små saker. Det jag gjorde förra veckan som var nytt för mig, fast fortfarande inte helt nytt, var att implementera animationer på skölden när den laddas upp. Det låter inte svårt och det var det jag tänkte när jag började med det hela.

Jag hade lagt dit en placeholder rektangel som bara fyllde ut hålet i HUDen när spelaren aktiverat skölden. Den blev mindre när spelaren tog skada och spelaren tog skada på sitt hp när skölden tagit slut. Det jag behövde ändra och lägga till var hela animationen på skölden som fylls på, en timer som efter 8 sekunder fyller på hela skölden igen med samma animation som när man aktiverar skölden, tillsammans med det nollställs den timern när spelaren tar skada så att skölden fylls på 8 sekunder efter spelaren har tagit skada. När skölden har fyllts på ska även en pulserande animation spelas hela tiden och den animationen ska förminskas när spelaren tar skada.

Det första jag gjorde var att ladda in ett spritesheet med hela animationen på i vår animationsklass. Vår animationsklass laddar in alla frames i en lista av rektanglar som den väljer ut från spritesheetet och spelar upp i en viss tid per frame update. Inladdningen av animationen gick smärtfritt eftersom jag har implementerat många animationer vid det här laget. Jag behövde nu lägga till en timer som räknade lika länge som animationens längd i sekunder för att sedan byta animation till den pulserande animationen när recharge animationen spelats klart. Det här steget gick också bra av samma anledning som tidigare. Det jobbiga steget som jag inte hade gjort förut var att försöka få den pulserande animationen att förminskas i bredd när spelaren tar skada. Den tidigare lösningen jag hade gjort var att ta en 1 pixel bred bild som jag sedan kallade på funktionen setScale på och skickade in sköldens ”liv” som argument. Men det funkade inte nu eftersom animationen inte är 1 pixel bred utan den är 41 pixlar bred. Lösningen jag kom fram till som var lättast och den enda som jag kunde förstå och orkade programmera klockan 2 på natten var att skapa en rektangel som är lika bred som sköldens ”liv” och bara rita ut animationen med samma storlek som den rektangeln. Detta görs med funktionen setTextureRect som tar in en IntRect som argument. Detta löste mina problem och ritade ut animationen rätt.

Mitt program som jag kan göra gifs med funkar inte just nu så får ta min gruppmedlems bild som inte har den fina animationen som jag pratat om i detta inlägg. Den har dock den andra animationen som jag lagt in som finns på skeppet istället. 🙂97102695740e036c79fe3f1be6d6224f

Tiled hitboxes

Förra veckan spenderades mestadels med att komma på ett sätt att exportera hela vår karta från Tiled till spelet och få hitboxes att fungera. Det var inte det lättaste jag har gjort.

cave_floor

Det hela började med att grafikerna ritat upp hela kartan i programmet Tiled. Det som är väldigt trevligt med det programmet är att det funkar som ett ritprogram där man laddar in ett så kallat ”Tile sheet” som innehåller alla väggar och golv som ska vara med i kartan.

Sedan väljer man en av rutorna, våra är 32×32 pixlar, och börjar måla. Vi hade redan en design på hur kartan skulle se ut så grafikerna tog den mallen på ett lager bakom själva banan som de ritade på och bara följde linjerna. När detta blev klart så blev det väldigt snyggt, men detta var det lättaste steget.

level_1_v2

Tiled har en funktion i sig som är mycket användbar för programmerare och folk som vill göra spel som är byggda på tiles. Det funkar genom att man kan exportera hela banan som en .csv fil eller .tmx fil. Detta är ungefär som textfiler som skriver ut siffror. Massa siffror. Närmare sagt 17050 siffror, eftersom vår bana är 155×110 tiles. Det man gör som programmerare då är att ta denna ofantligt stora textfil och laddar in den i c++ med den inbyggda funktionen fstream. Den tar en fil och läser varje rad och lägger in raderna i en lista. Denna lista konverteras sedan till en integerlista som tolkas av c++. Hur kan den tolka siffrorna? Jo den tar siffrorna i listan och samtidigt laddas ”tile sheet” in tillsammans och alla tiles i den bilden har ett id. Dessa id nummer är samma nummer som hamnar i den mycket stora listan. Så nu kan c++ associera siffrorna i listan med en tile i bilden som laddades in. Nästa steg är att rita ut dessa tiles i rätt ordning med rätt bild tillsammans så kartan syns. Detta görs genom att göra en loop som kollar igenom den långa listan, som är en 2D array, och placerar ut alla tiles på sin position. Tile nummer 5 som på vår karta har id nummer 9 placeras på pixel nummer 32*5 (32 pga. tiles bredd) vilket blir 160, så c++ ritar ut en tile nr 9 på plats 160 etc.

När detta är klart så ritas kartan ut rätt, problemet är att det inte finns någon kollision. Jag själv hade mycket svårt att greppa hur jag skulle kunna få till kollision eftersom man inte ska kolla kollision på alla tiles på hela kartan för det skulle ta alldeles för mycket minne på samma gång och spelet skulle spela väldigt segt. Så tanken är att kolla kollision med endast de tiles som finns i närheten av spelaren, helst endast de som spelaren ser på skärmen. För att lista ut det så tog jag positionen av spelaren i x subtraherade hälften av bredden på skärmen och dividerade med 32 för att få vilken tile som låg längst till vänster. Jag gjorde samma sak på y led men subtraherade hälften av höjden istället. Nu hade jag ett minsta x värde och ett minsta y värde på tilesen som spelaren ser. För att vara säker så tog jag minus en tile så att hitboxes kollas precis utanför skärmen. Nästa steg är att ta reda på de tiles som ligger utanför till höger och neråt, det gör man enkelt på samma sätt som innan men ändrar ekvationen till spelarens position i x adderat med hälften av skärmens bredd och dividerat med 32 och såklart samma som tidigare med y led.

minX = (shipPos.x – viewSize.width) / 32;

maxX = (shipPos.x + viewSize.width) / 32;

Samma för y led.

För debugging syfte så kan man rita ut rektanglar runt dessa fyrkanter som visar ifall hitboxes räknas ut korrekt. Om allt har blivit korrekt så kan man börja ge kommandon till spelaren när den träffar denna box. Boxen som vi har som är vägg är id nummer 9, så det är dessa som kollar ifall spelaren nuddar, varje update i spelet. Jag tänkte först att lättaste sättet att veta ifall spelaren nuddar en box uppifrån eller nerifrån eller från sidan är att kolla hur vinklad spelarens skepp är. Så ifall spelarens skepp är vinklad mellan 0 och 180 grader så pekar spelaren neråt, pga. C++ som läser 0 från höger Rotation-differences
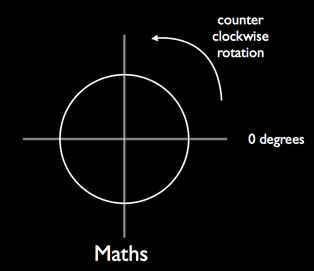
, eller om vinkeln är mellan 0 och -180 så pekar spelaren uppåt. Samma sak med sidorna mellan -90 och 90 så pekar den åt höger eller vänster.

Men så lätt var det inte eftersom 76 grader är både emellan 0 och 180 och -90 och 90 så skeppet flyttades runt oberäkneligt på skärmen. Efter ett tag gav jag upp och frågade en kompis som hjälpte mig att förstå hur det borde utföras. Om spelarens x position subtraherat med tiles x position är positivt så vet vi att spelaren är på höger sida. Detta eftersom c++ räknar origo högst uppe till vänster och positiva x är till höger och positiva y är neråt. Samma sak ifall vi får ut ett negativt tal så vet vi att spelaren befinner sig på vänster sida. I y led är det inte annorlunda, ifall differensen blir positiv befinner sig spelaren under tilesen och ifall differensen blir negativ befinner spelaren sig över. Nu visste jag exakt vart spelaren träffar tilen och kan, från den fina intersect funktionen få ett return värde som berättar hur mycket två boxar träffar i bredd och höjd och putta tillbaka spelaren eller flytta den i motsatta riktningen som den träffar tilen.

Vi hörs nästa vecka!

Analysis of group 7

To begin with the code was easy to understand even for someone that doesn’t have so much experience. When looking at the player class, it does not have any couplings except the stdafx.h file that contains some includes but other than that it’s no more. This makes it hard to give feedback on how to make it smaller. Instead I would divide all that does not entirely have much to do with the player class, like the clouds, potatoes and bullet impacts. The reason I would have chosen to do it this way is because it’s much easier to edit and debug the code if everything is divided into their own classes. In these classes they can have code that is only related to that object, i.e. draw and update themselves. This will also reduce the code inside the player class for easier navigation in the code. However this change might make it harder for beginners trying to understand which class is connected to what.

Animations

Betan nalkas och grupp 6 kämpar vidare för att klara målen.

Förra veckan tillbringades till att lägga in animationer, ljud och hitboxes för kartans väggar. Denna bloggpost kommer handla om animationerna som jag lagt in i programmet och den svarar på frågorna hur och varför jag gjort som jag gjort.

Vi hade inte tid att lägga in animationerna till alla assets i spelet i ett tidigare stadie men jag har kollat lite snabbt igenom tutorialen på githubs hemsida för att kunna uppskatta hur mycket tid det behövs för att implementera. Förra veckan började det närma sig betan och det var en bra tid att börja lägga in animationerna.

Jag tog tag i github’s tutorial och följde stegen. Efter att jag implementerat båda klasserna som tutorialen visade och laddat in spritesheetet som jag fått av Peter så, såklart funkade det inte, det ritades ut en stillastående bild. När jag kollar runt i koden märker jag hur mycket jag har snöat in mig i detta och hur tutorialen blev väldigt komplicerad när den applicerades i vår kod. Efter många timmar av trial and error så frågade jag hur en annan grupp hade löst sina animationer. Anton Olin hjälpte mig med att förklara deras animationmanagers så att jag kunde använda samma teknik i vår kod. Det gick mycket bättre och den koden var väldigt mycket enklare att förstå än tutorialen jag följde. Allt som behövdes göras var att ladda in spritesheet’s koordinater i en lista och sedan lägga in hur lång tid varje frame skulle spelas upp sen skapas en texturerect som har regionen av texturen och en texture som har texturen av spritesheet. Sedan ritas den ut och animationen spelas upp.

Jag tog beslutet med att inte använda githubs tutorial för att jag kände att jag snöade in mig i all kod och allt blev bara krångligare ju mer jag försökte fixa. Det bästa med att ta hjälp av en annan grupp som fixat samma problem är att man börjar om på nytt och får en genomgång på hur de fick det att funka, vad för fel de stötte på och hur man kan undvika dessa i framtiden, så det blir nästan garanterat att det funkar för andra projekt också.

När animationen fungerade för idle/walking så ska den ändra animation när den kommer tillräckligt nära för att attackera spelaren. När spritesheets etc. för attacking var inlagt så försökte jag ändra animationen, men då kraschade programmet för att spriten blir NULL. Jag har inte löst detta än men det känns mer som ett slarvfel från mig som jag kan lösa fort om jag sätter mig ner och tänker lite. Jag gick vidare och la till animationerna till spiderlingen som också lades till. Jag gjorde likadant som med den första fienden.

81a944556ae77755262af39b677ed531